Pages
▼
CupCake Pops and Cake Bites
Cupcake Pops
Cupcake Bites
OK, so I copied Bakerella whom I LOVE by the way and think is totally amazing!
Mine are not as pretty as hers are. My chocolate dipping skills need some work. But I did make a tutorial on how I made them. So here goes:
Items you will need:
1 cake mix, baked into a 13x9 inch cake ( I had left over cupcakes in the freezer, I just pulled out 24 and used those)
2 cups of buttercream or cream cheese icing, or 1 can of premade icing
1 flower shaped cookie cutter (1.25" in diameter)
1 package of chocolate bark
1 package of white chocolate bark, or colored candy melts
bowls for dipping
wax paper
cookie sheets
lollipop sticks
sprinkles and m&m's
small plastic treat bags and ribbon for packaging
styrofoam block
food processor (optional)
2 tbs cookie dough scoop
Crisco or Paramount Crystals
1. Bake your cake in a 13x9 inch pan, let cool completely.
Crumble into fine consistency or put in food processor. I used a food processor so I could get it all nice and evenly crumbled.
2. Add your can of icing or homemade icing.
3. Mix thoroughly using a large rubber spatula or the back of a spoon. It will have the consistency of cookie dough.
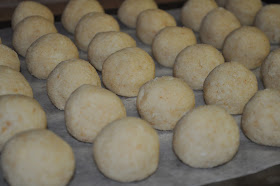
4. Use a 2 tbs cookie dough scoop to measure out equal portions of the mixture, then shape into balls. The balls should be 1.25" to1.5" in size. Then place them on a wax paper covered cookie sheet, cover with plastic wrap and place in the freezer for 15-20 minutes.
6. Once they have chilled, take them out of the freezer and roll them into a cylander shape like this:
7. Use your cookie cutter to push the dough into the mold. I found I had to reshape the tops a little. Push it half way up. Use your thumb to push it out of the cutter and set it on wax paper. If you are making alot, it may help to only take few at a time out of the freezer so they don't get all gooey on you. I am in Texas and it is hot an humid. By the time I got to the 30th one they went all gooey on me.
7. Continue until you done them all. Put them back in the freezer to 10-15 minutes.
8. While your cupcakes are in the freezer start melting your chocolate. Follow package instructions. 30 second increments are best, stirring in between. Do not over heat your chocolate, or get water in it, either of those will cause your chocolate to sieze up.
tip: you may need to add a little crisco to your chocolate to soften it up.
It will make for a smoother finish.
I did not do that this time, I will next time. The pink did not have a nice
smooth finish.
10. Dip the tops into the colored chocolate, add sprinkles and an m&m for decoration.
Different sprinkles...
Here are some all dressed up and ready to go.
I made them for a bake sale at my sons school. They went for $2 each!!
St. Patrick's Day Cupcakes

St Patty's Day is just around the corner. Here are some yummy chocolate cupcakes with chocolate icing. It makes a nice contrast to the green cupcakes papers and green sprinkles, sitting on my handmade cakestand.
.jpg)


